
 Sign In
 Support


Mesh-y Me **Warning- Lots of pictures**
Well I'm about ready to reach through my computer to whoever has the Workshop and are doing the preliminary beta testing for the objects, grab it and say, "Gimmie that!!"
I'm at one of those points where I know I can do well, but I'm still afraid that I just think too highly of my skills. Self confidence has never been my strong point. So instead of just sitting here saying that I am a mesher, I'll showcase some of what I have done for Sims 2. Most of these objects have not been uploaded anywhere because the sets I intended them to be in are incomplete, or were just never finished because of technical difficulties (uv mapping, would not work in-game, could not figure out how to get them to work in-game, etc.) The meshes are not the highest quality that I am capable of, I often have to reduce the poly count to fit within the constraints of the game. How I would love having no poly counts!
To boast, or not to boast...
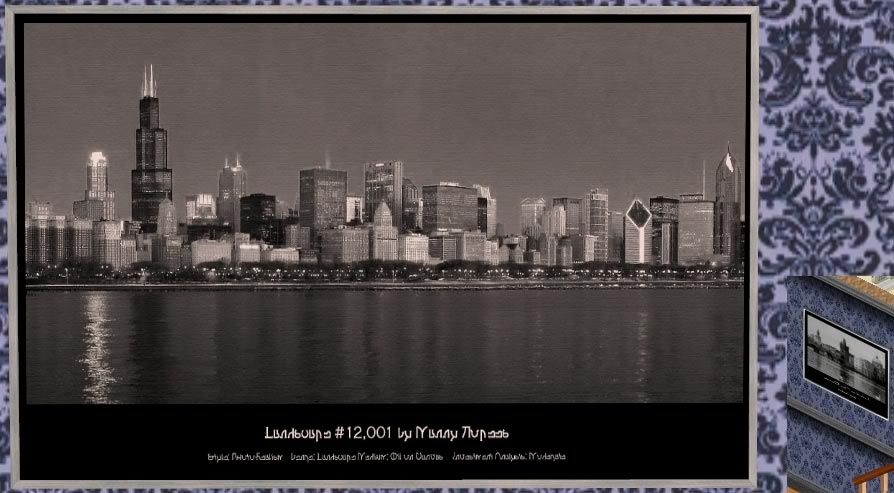
One of my biggest strong points with meshing is converting things from Sims 1. Over the course of Sims 2 there was painfully few meshers who had taken the time to do this, and it's definitely not easy. The only real meshes in Sims 1 were the Sims themselves, everything else was a sprite. What you are left with are painfully small pictures in perspective that had the tendency of mirroring the left facing pic for the right facing one (less work for the artist.) Even the 'full size' picture of the objects is very small. Here's an example of a full sized Sims 1 screenshot:
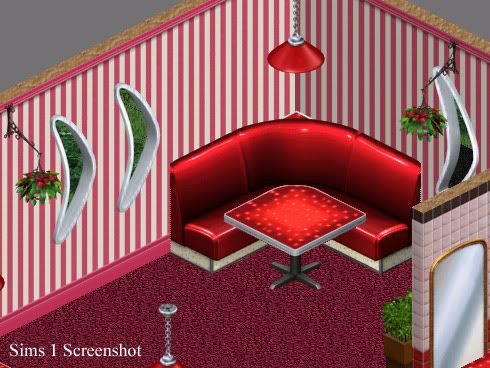
Now, after you have the screenshot, the picture needs to be yanked around and trying to get it out of perspective and make it like it was a straight on shot. Often being stretched ten time larger than the original picture, making it exceedingly blurry. A lot of the time I think about how much interpretive work this is. There is nothing straight forward about it.
All I know is that I bend my mind inside out figuring how, if this was a real world object, it would be built. I have a huge mental catalog of how things are put together, built, and made as well as considerations like proper materials and structural integrity. Yes, I do this for fun!
It may not seem all that difficult (based on what can be seen in this screenshot) but a lot of these objects are bigger with more simple lines to them. The more curves and roundness to an object, the more difficult it can become. The black bracket for the hanging plant I'll use as an example. First off I'd have to sit and examine the picture for a while (ten minutes to a half an hour if I'm lucky) to figure out the construction and how it was (hypothetically) made and attached to the wall. Were the decorative curls welded on, or was it cast as a single piece? I assume it would have been cast iron (because it's so black and has been common in the past). Eventually I'd get around to actually doing the mesh, making painfully sure that all the curls were placed right, forming the part against the wall right so it would actually look attached to the wall when it was finished, and all of that doesn't even include the plant! (And in case you are wondering, I have never done that mesh... lol)
Now the point of all that was to illustrate that even something like the 'simple' window, really is not all that simple.
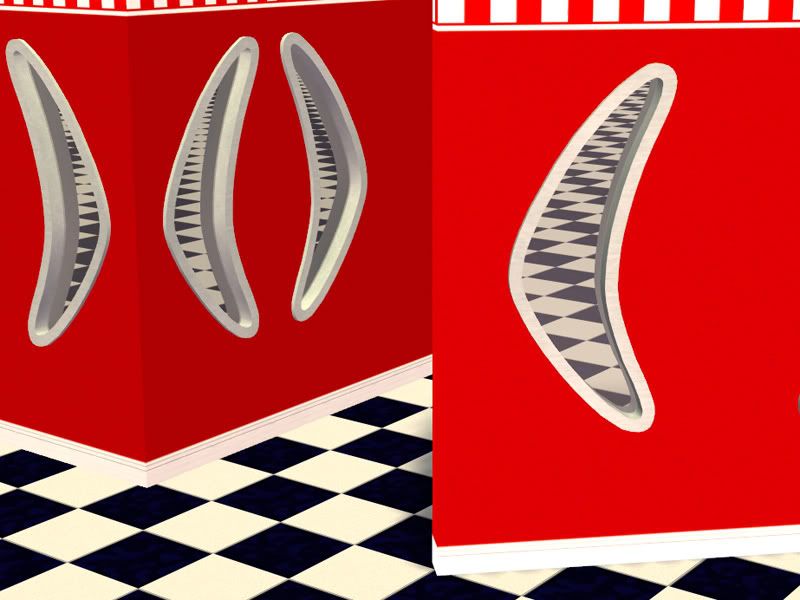
This window is one of those instances that I really was frustrated at having to stick to a poly count. I was so used to staring at the mesh very, very closely and was getting frustrated at how 'blocky' it was. In retrospect, it's just fine. I think this is something that I have to learn to adapt to, even though I don't like it. I'm learning that textures really make a lot more difference than just adding color to something, an alteration my mind doesn't like making.
Here is the completed window in Sims 2. Sometimes it surprises me when I'm looking at my finished meshes next to the original screenshots and thinking, "Wow, I did that!?!"
Sometimes I wonder how much I'm off my rockers because I love sitting there shifting vertices around for hours on end. :D
Am I a bit of a perfectionist? I think maybe a little...
My most successful object to date has been my Makin' Magic Bed.

Before I updated the meshes to be base game compatible, I had over 12,000 downloads of just the meshes (not my recolor). As of today, there has been another 4,500 downloads. This really boggles me. Even my brother said he sticks it in every one of his houses because he likes it so much (not because his little sister made it).
It took me over a week to do just the headboard (that I duplicated and squished for the matching foot board). I spent at least 45 minutes working with the original screenshot trying to take the perspective and distortion out of it before I could even start meshing.
Fun fact: The leaves were actually made by hand. I literally created the faces individually by connecting the vertices. *laughs*
I know better than that now, but I also know why the front of the drape never looked right. I looked at the mesh again today and just started laughing. I had no idea what smoothing groups were at the time (3 years ago) and the whole bed is yellow except the front of the drape that is bright purple in the smoothing groups.
I also didn't know about the per square poly count then either, and I spent SO much time stressing that the poly count was too high! I'm still checking to see if it is or not, but I think it was lower than it could have been... (I think it is about half of what it could have been for that size object!)
Please, just don't look at the UV map for this thing... it most likely will make you ill. I still can't believe I mapped it in UVMapper Classic. UGH! Is it any wonder that I demanded that my Hubby get me the Pro version?? This is one object I'm considering updating for Sims 3, but may require a complete mesh remake especially now I have a lot better idea of what I'm doing! Besides, the drape is as thick as a blanket! *laughs*
Ya win some, ya lose some...
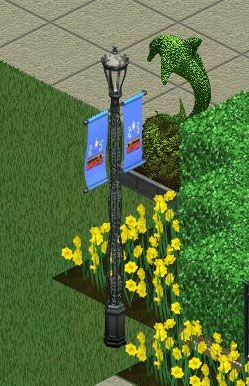
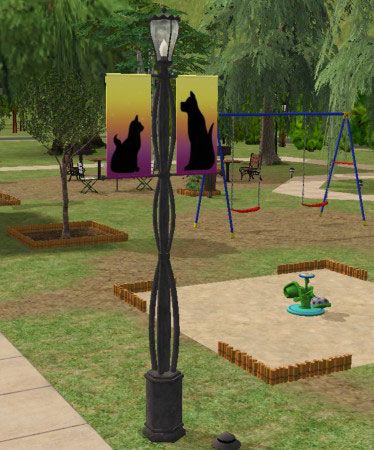
This one was a rather difficult one to do, mostly because the details of what the main post should look like you can't really tell what it should be exactly. It turned out similar in some ways, but different in others. I had never seen a light like this before in my life so I felt like I was going at it a bit blind.
I was really excited to do this because I so severely missed it on my Sims 2 community lots.
A few years later I realized that it was broken. It lights everything 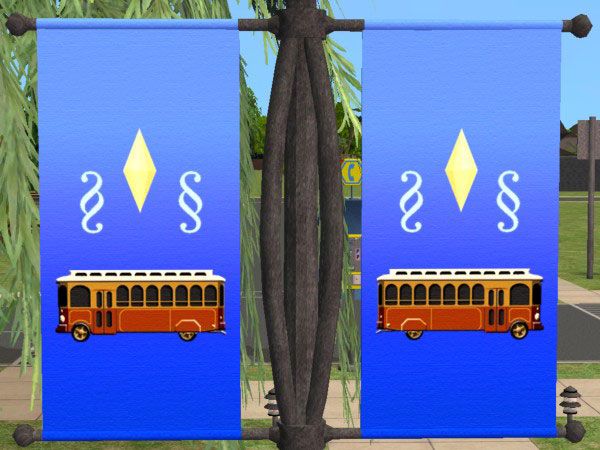 except the light post mesh itself. I still don't know how to fix it.
All of the matching banners that came with the original light I had to completely remake from scratch. None of the images could just be slapped on my mesh and be up to the Sims 2 graphics standards.
Perhaps that's one of my downfalls? Simply being too good at what I do, I'm not sure if people ever realize that I don't (and can't) just pull something out of Sims 1 and 'upgrade' it to Sims 2 (or 3.) Perhaps people just don't care, I'm not sure.
Rebuilding images can be an impossibly difficult task, most especially because the art style of the original creator needs to be mimicked as well.
Some things from the Makin' Magic expansion I still miss desperately that have less complicated meshes than some of the objects that I have done. But the issue is that I'm at a complete loss of how to redo the artwork. I love the Sims 1 so much because it was the most stylized version of the game. When they did a theme, it left you just saying "Wow." It seems like the further the game goes, the more watered down and generic the styles are (Sims 3 hair anyone? *Yuck!*) Even the description of the objects that I've paid attention to in Sims 3 really lack the fun and humor of the two previous versions of the game. Bad puns do not replace quirky cleverness...
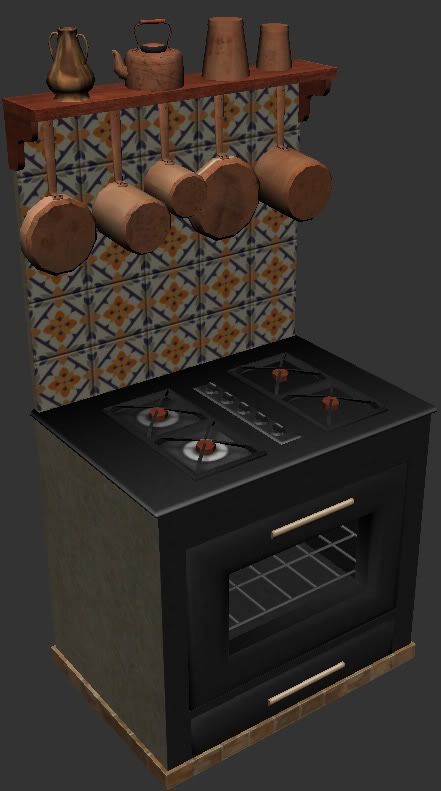
This is my longest work in progress so far, mostly because of a few factors. For about a year and a half I wouldn't touch it because back of the stove would flash on and off whenever the stove door would opened or closed. Numenor at Mod finally explained it to me because I never had a reason to assign vertices to joints before. I am SO glad that I know how to do it now, but it had confused and angered me for a long time. 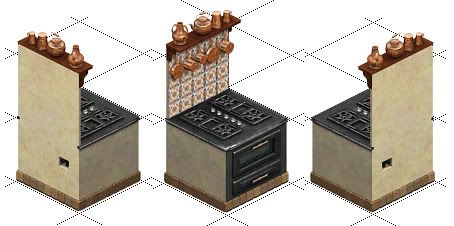
The burners had a few issues, mostly they are an odd shape, I wasn't sure of how to give them the right shading and texture. The biggest issue is from the function of the stoves. In Sims 2 & 3 (from what I have seen) all the Sims cook on 6 burner stoves, but only use the one in the center front. For my stove that means they will be cooking on the burner knobs...
*sigh*
Its details like those that drive me batty. How many people actually have a 6 burner stove? Even if you did, what a waste to only use one burner!
Overall proportions of the stove had to change because of the animations. Sims 1 version is shorter and more square, while mine is more upright because I based it on a Sims 2 stove mesh.
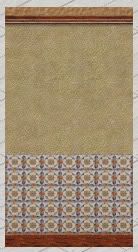
The reason I have the wallpaper up there is because it illustrates my earlier point of remaking textures. This is an actual full-size screenshot of the wallpaper that matches the tiles on the back splash of the stove. I put it on a diagonal wall so I wouldn't have to yank it out of perspective as stated before. The tiles on the back of my mesh are actually smaller versions of the original remade tile I made that is 700 pixels square. I'm still amazed at how (relatively) close it looks. A lot of the time I have to stop and think about what I thought it looked like back when I played Sims 1 regularly to help fill in the missing details, like what this tile should look like on a larger scale.
My last major issue, as is very obvious, has nothing to do with the mesh but with the copper texture. I have tried everything that I know how to get it to look like it should and it still looks bad. The good news? I'm hoping that with how Sims 3 has changed the way textures (and metals) are done that I can finally get it to look right.
I have thought very extensively on if there is a way to make the mesh more detailed, but also keeping the count down. Sounds like a contradiction, right?
The best compromise I have thought of so far is to break up the stove. Having all the decorative objects, pans, shelf, and even the back splash all separate. I think it's best this way because of multiple reasons.
1.) Recolorability- As is, the game allows 3-4 recolorable parts for an object. So what parts would I make recolorable? There are a minimum of 6 areas that have different textures. Copper pieces, wood shelf, tiles, black stove, tan stove pieces, and the brick base.
2.) Texture quality- All the texture of the stove is on a single 1024x1024 size texture. If this were broken up between different objects it would make it more possible for slightly higher quality textures (copper pieces especially) but I think it would make things look MUCH better than they would be as one object when recoloring with any other textures. I try very hard to make my meshes relatively easy to recolor, and this one has been especially difficult because of the sheer amount of different pieces that fit onto a single texture.
3.) Mesh quality- This applies most especially to the hanging pans. If you look at the large flat skillet, you can easily see how blocky it is. I have not been happy with this at all but was trying to fit everything on one mesh like the original appears to be. tyring to stay within the poly count for a single tile.
4.) Customization- "But I want a different picture on the backsplash!" "Wow, there are way too many pots!" "Can I please get just the shelf and kettle without everything else?" I know that everyone plays their game just a little different, that's what's so cool about our Simming world. Even I wouldn't want the same exact stove in every one of my houses that would want that style. Sure doing it this way makes the 'original' stove take a higher poly count and more textures overall, but the option is given to the individual player on how they chose to use it, and what their setup can handle. The shelf clutter and the pots will all be individual items (most likely countertop clutter versions too!) the shelf will be a wall decoration, the backsplash will be a painting (easy recolors!) and then the stove with the brick base. This also means that you can position the shelf clutter anywhere on the shelf that you want on the shelf, even if it is across the room from a completely different stove!
Do you think that anyone would notice if I just made the decorative pieces work with the existing game's cowpoke stove? That would eliminate one more nearly pointless mesh to download and fill the game with... Would they catch on fire? Who knows, that could be a plus! *laughs*
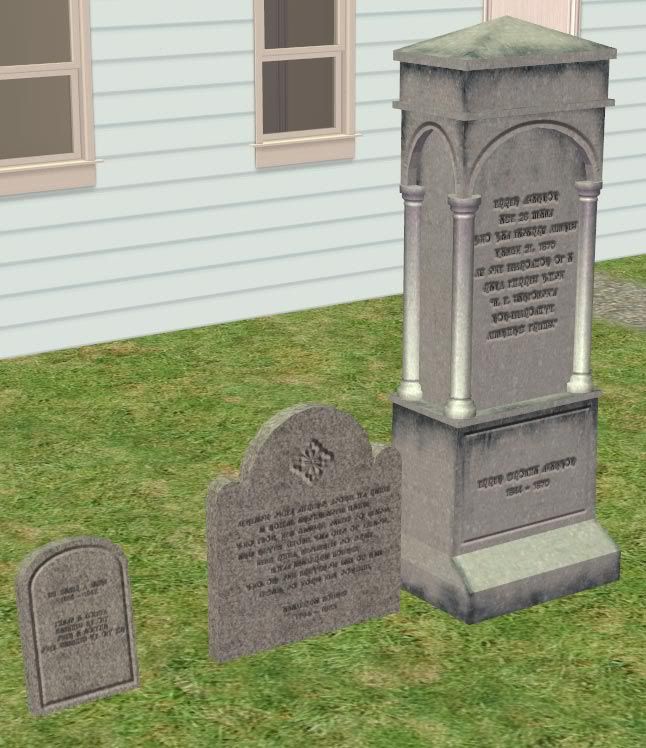
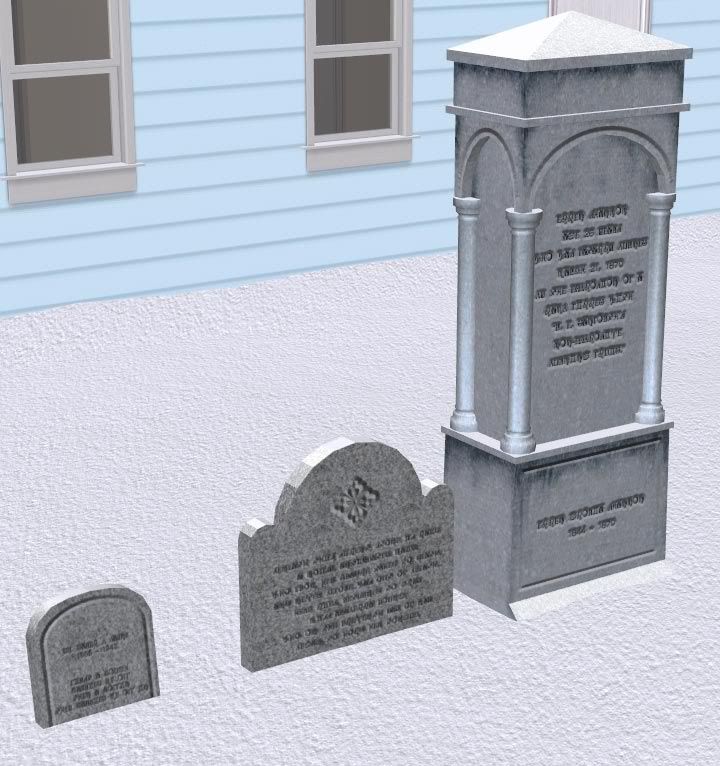
The top two pictures are my tombstones (the 2nd being covered in snow from Seasons). I need to remake the mesh for the middle one because it is a bit too low poly count, and the blockyness really shows when the snow is on it. I'm glad that Sims 3 has a large variety of tombstones again, but you can still never have too many especially without the extra attached ghosts! What is written on the tombstones I made intending for two recolors, one in English, and one in Simlish. They are meant to be funny, although in a rather morbid way. As complex as it is, I really had a lot of fun making the large tombstone.
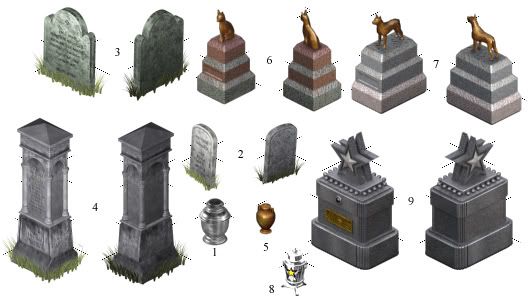
The third pic is of all of the tombstones and urns from all of Sims 1. This is a set I would really like to complete, but the last picture indirectly shows the problem.
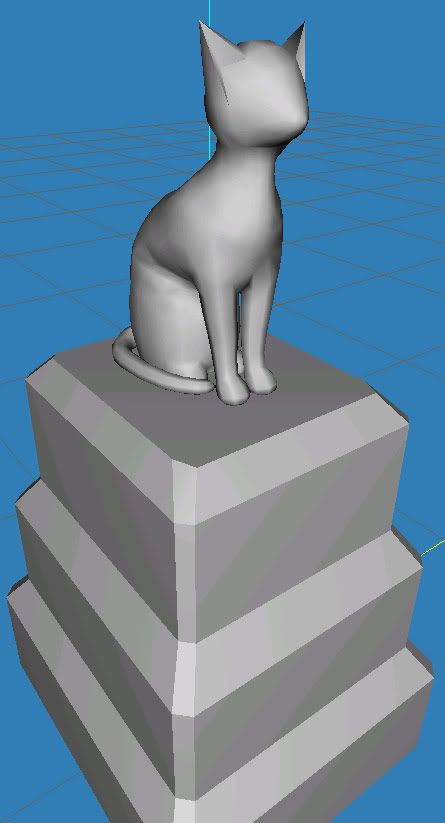
"The cat tombstone looks great, but I don't see the problem!"
I don't even know anymore how many times I nearly gave up on this mesh. I think it sat there with no front legs and a tail for about a year. Oh, and you see that it has no texture? I cannot for the life of me figure out how to map it. The other problem being is there is just the cat mesh, no dog mesh. I want to start crying my eyes out thinking that there is still another animal mesh to do... Fleshy, body type meshes are not my strong point, and also why I don't do clothes meshes. They don't make sense to me. Even doing an exact replica of the Eiffel Tower, or the Leaning Tower of Pisa would be easier to do than an animal mesh. I have been really thrilled about this set but the only way I can think on how to get the dog tombstone done is to pull the pet dog mesh from Sims 2, reduce the polycount and alter the mesh so it doesn't resemble the original (but still looks like the dog on the tombstone) but it wouldn't be completely my own work. Although I know on my own I can't do that mesh from scratch. All the remaining ones will be fun and easy, just not the pets.
Earlier this year I tried to get a group together to see if we could have a group effort to remake the Sims 1 lots for the Sims 2. The lots themselves have been remade before (MellySim on Mod before she and all her uploads went *Poof*) but I wanted to recreate the stuff in the houses as well. The only problem was that I was the only mesher, and most of the other people didn't have Sims 1 to get screenshots from. I had been hoping that it would be a group effort, not me racing around doing everything but what I wanted to do...
So here are the things I got completed before getting thoroughly burned out. We were working through the Goth house as somewhere to start (I had started on the tombstones already), even though I think there was some objects that could be imposable to make and function properly, like the one tile fish tank. There are a few more meshes and other pieces in this set that I did too.
The Sims 1 bushes with the brick bases turned in to a monster of a set (25-32 pieces!) that I was working with someone to have them use the repository technique but at one point I got thoroughly confused as to what part I was at! I also remade the Sims 1 easel but I think it will work with the Sims 3 easel floor placement better. I also had remade one of the carpets, the bathroom's green tile walls and floors, and a very close version of the living room wallpaper.
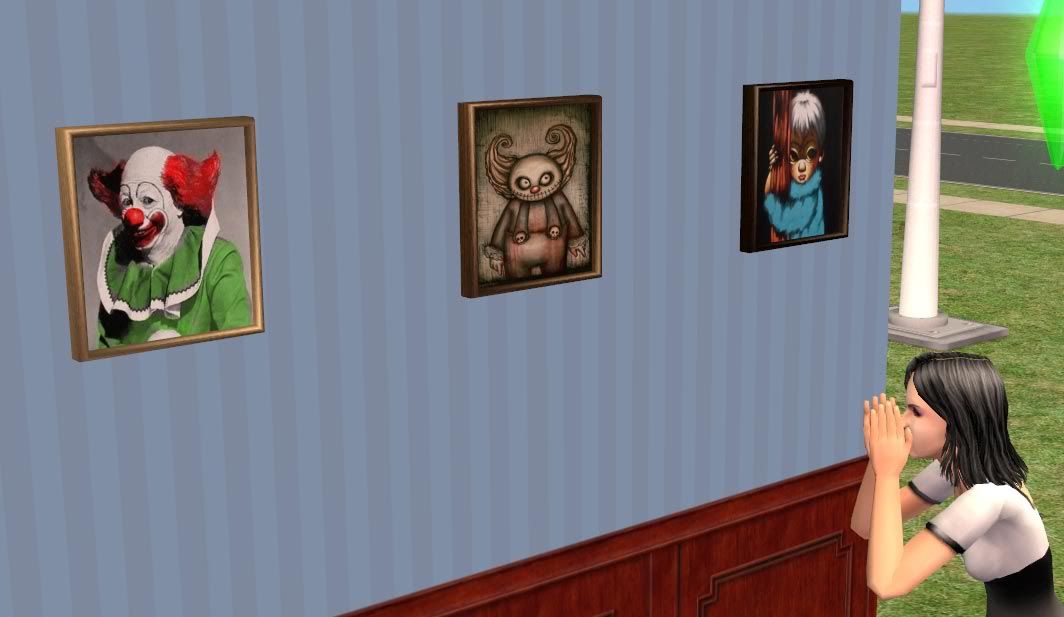
This is my version of the Tragic Clown painting as well as some of the recolors I did. I did not actually make the pictures in the recolors, I found them with the Google image search.
And the really big one from the Goth's living room. This is a really cool one to recolor because it's a two tile object and the pictures look great!
You can also see some of the remade wallpaper behind the painting as well.
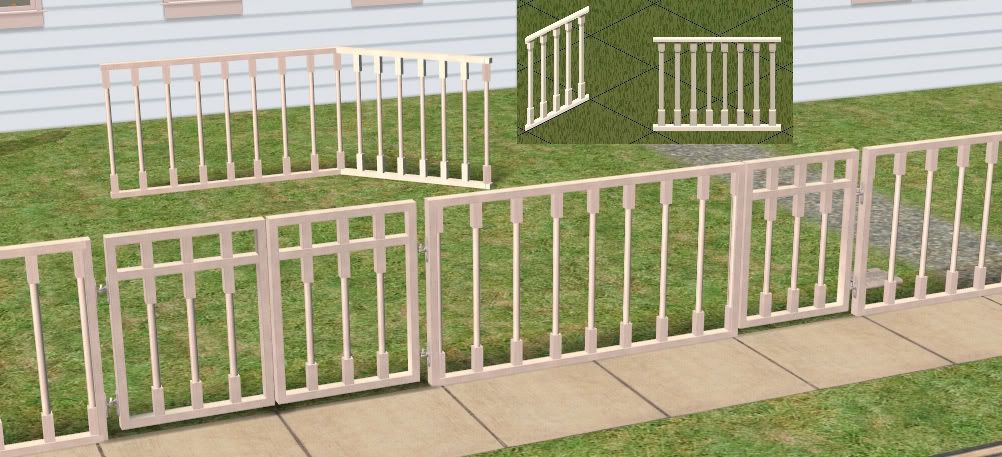
This fencing was by the stairs in the 2nd floor room of the house. Isn't is SO nice to build buildings with more than two floors? Sims 1 didn't even have foundations!
Also the Sims 1 version didn't have gates. I had to think of what would look like it fit with the fence beacuse I didn't want it to look out of place.
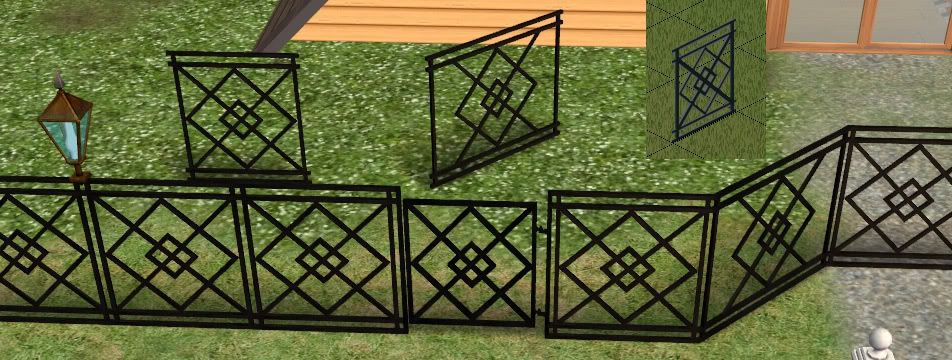
Now these two fences are odd. I always loved how they looked, but for some odd reason the original creator of the fence had the diagonals be a different pattern from the straight pieces. In Sims 1 this was all one fence.
The gates on these were definitely a lot easier to do, and I think I love this fence even more now than I did in Sims 1.
The only problem is that the need to be remapped because when they have any actual (non-black) texture on them it looks vile.
Despite all of the Sims 1 conversions that I have done, I do have some original projects as well. 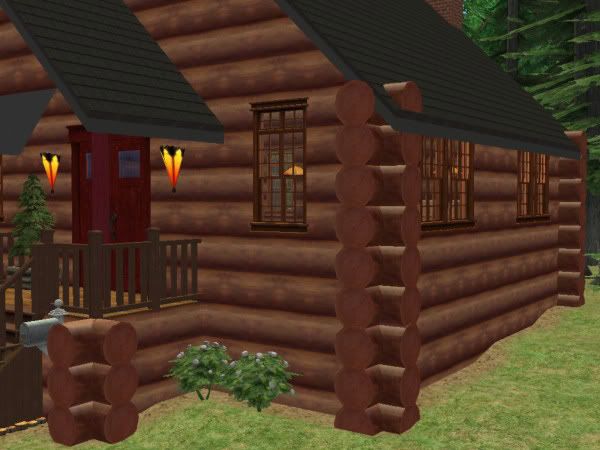 I was so tied of log cabins looking like
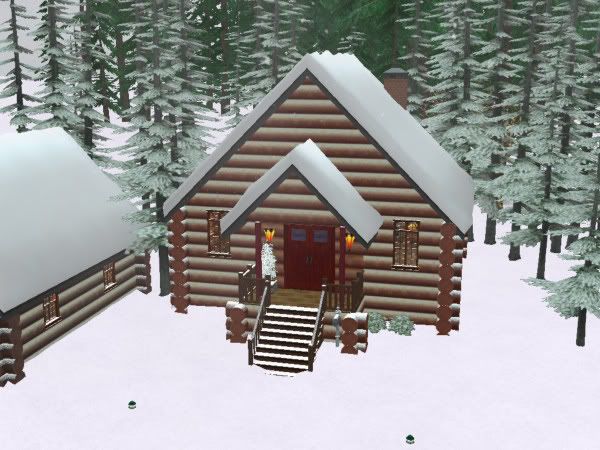
 cardboard boxes! This was the beginning of my Loggin Kannuck set that consists of the log end corners for regular walls and foundations, matching wallpapers, and coordinating flooring.
The textures are much higher quality than the picture looks.
The wallpaper was a real pain to do because I had to line up the camera in-game with one of the corner pieces just right to get the perspective right and the lighting to show properly.
Snowy versions of the wallpapers I added the snow by hand in Photoshop and was very happy that they turned out so well. The snow affects from Seasons just make this look perfect, although I made the lot just for the screenshots.
Even now I wish I could spend my winter holidays there and sit by the warm fireplace with a cup of hot cocoa!
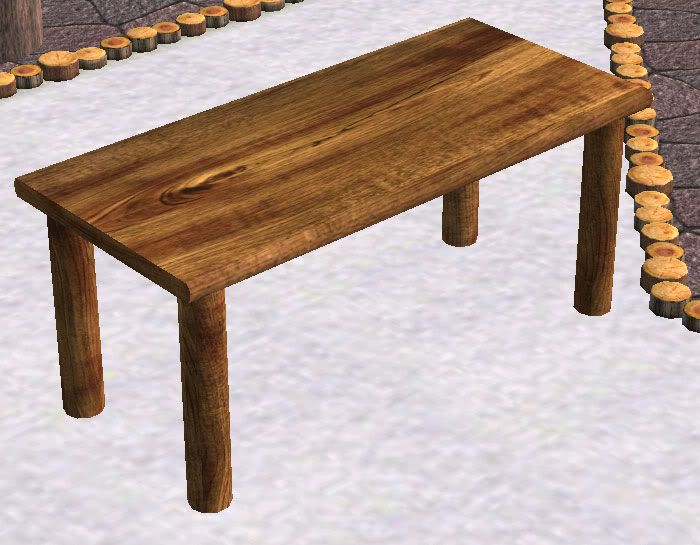
I was intending on making this more of a more full set of "back woods" type log cabin furniture and building objects. Granted that it would fit with the stuff from the Vacation expansion cabin furniture, but with a lot of other pieces to fill out the entire set. My idea for the sink still makes me laugh.
I made a column that looked like a really big log (you can see the bottom of it in the upper left of the table picture.)
This is the basic table I made for it as well, although I'm not sure if it is a bit too basic. Maybe it just needs a table cloth.
One of the reasons why I like this set so much I think is because I really like playing with wood textures. For me if I map something and can slap on any random wood texture and it looks great, I know I've done well.
Similar set to this one that I have worked on is an apple crate furniture set. I could make at least 100 recolors for how many old fruit crate lables I have and that's no exaggeration. I originally started on it to have some more country store type crate shelves to work with Open For Business and it started to grow from there. I've also wanted to make some decorative canned food stuff too. That's another huge collection of labels I have that I really want to use.
Needless to say I love meshing and I hope I can find somewhere to fit here on TSR.
P.S. Please forgive me for the painfully long post or if I may have exceeded a picture limit. I didn't see anywhere that stated if there was any. I did resize most of the pictures to try to keep it a bit more tamed...
Lots of Love,
~Corsetcrush


 Limited Time Offer
 For a limited time only, we’re giving away a free


